Installing IncusOS on Intel NUC
This guide walks you through installing and configuring IncusOS on an Intel NUC device. IncusOS is a dedicated operating system designed specifically for running Incus, providing a streamlined platform for container and virtual machine management.
Overview
Installing IncusOS on an Intel NUC involves:
- Downloading the IncusOS image: Creating a custom image from the IncusOS Customizer
- Setting Windsor context: Initialize the workspace context with
windsor initandwindsor context set - Updating windsor.yaml: Configuring workspace variables including the image path and USB disk
- Preparing the image in workspace: Copying the image with
task device:prepare-incus-image - Preparing the NUC: Updating BIOS, configuring Secure Boot, and wiping existing storage
- Creating the boot media: Writing the IncusOS image to a USB device
- Booting and installing: Booting from USB and installing IncusOS to the NUC's storage
- Generating a trust token: Creating a token on the NUC for CLI authentication
- Connecting to Incus: Setting up the Incus CLI client and connecting to the server
- Configuring network: Setting up direct network attachment for VMs
- Accessing web UI: Setting up and accessing the Incus web interface
- Creating storage pool: Creating an optional ZFS pool for faster VM disk I/O
- Getting certificates: Retrieving client certificates (optional)
IncusOS provides a complete, dedicated operating system optimized for running Incus, making it ideal for production deployments where you want a minimal, purpose-built platform.
Prerequisites
Before starting, ensure you have:
- Intel NUC BIOS updated (recommended): Follow Update the Intel NUC BIOS before installing IncusOS
- Intel NUC device: Compatible Intel NUC (x86_64 architecture, 5 years old or newer)
- USB memory device: At least 8GB capacity (16GB or larger recommended) for the boot media
- Computer with macOS or Linux: For preparing the boot media and running the Incus CLI
- Network connectivity: The Intel NUC must be able to connect to your network via Ethernet
- TPM 2.0: The NUC must have a TPM 2.0 security module
- UEFI with Secure Boot support: Required for IncusOS installation
- At least 50GiB of storage: On the NUC's internal storage device
- Physical access: To the NUC for BIOS configuration and boot media insertion
- Windsor workspace: Clone or open the workspace repository
- Required tools: Incus CLI (
lxc/incus), Terraform, and other tools (see Installation Guide); the Windsor project recommends aqua for tool management
System Requirements
IncusOS requires modern system features and will not function properly on older unsupported systems:
- Modern x86_64 or ARM64 system (5 years old at most)
- Support for UEFI with Secure Boot
- TPM 2.0 security module
- At least 50GiB of storage
- At least one wired network port
Step 1: Download the IncusOS image
Determine installed drives (for customizer settings)
Before configuring the IncusOS Customizer, identify which drives are in your NUC so you can set the correct target drive identifier. The customizer matches drives by their /dev/disk/by-id/ names.
If the NUC already runs Linux (or you boot it from an Ubuntu Live USB), run:
# List all drives by persistent ID
ls -la /dev/disk/by-id/

# Filter for NVMe drives (M.2 blade SSD)
ls -la /dev/disk/by-id/ | grep nvme

# Filter for SATA drives (2.5" bay)
ls -la /dev/disk/by-id/ | grep -E 'ata-|scsi-|wwn-'
Example output for a NUC with one NVMe and one SATA drive:
nvme-WD_BLACK_SN850X_1000GB_23436M801614      -> ../../nvme0n1
nvme-WD_BLACK_SN850X_1000GB_23436M801614-part1 -> ../../nvme0n1p1
ata-SPCC_Solid_State_Disk_AA230815S325622103  -> ../../sda
Use a partial match of the by-id name as the customizer's target. For a single NVMe drive, nvme- is usually sufficient. For multiple NVMe drives, use a more specific prefix (e.g., nvme-WD_BLACK). Omit USB devices and partitions when choosing the target.
If you cannot boot the NUC before creating the image, use nvme- when the NUC has an M.2 NVMe drive (typical for NUC8ixBEH and similar models).
Download from IncusOS Customizer
Visit the IncusOS Customizer to create a custom IncusOS image tailored to your needs.
Recommended settings for Intel NUC
Use these settings when generating the image for installation on an Intel NUC:
| Setting | Recommended value | Notes |
|---|---|---|
| Image type | USB | |
| Image Usage | Installation | |
| Image Architecture | x86_64 | |
| Image Application | Incus | |
| Wipe the target drive | Enabled | Erases existing partitions and data on the target disk before installing. Use this for a clean install; disable only if preserving data. |
| Automatically reboot after installation | Enabled | Reboots the system once installation completes, so you don't need to manually remove the USB and power cycle. |
| Target drive identifier | nvme- |
Targets the NVMe drive (the M.2 blade SSD). The NUC's NVMe appears as /dev/disk/by-id/nvme-*; a partial match of nvme- selects it when only one NVMe is present. Omit or leave empty if the NUC has a single internal drive. |
| Apply default configuration | Enabled | |
| Certificate | Required | Generate and add a client certificate so Incus trusts your machine when you first connect. See below. |
Generate the client certificate
Before configuring the customizer, generate a client certificate on your Mac so IncusOS will trust your machine when you first add the remote. Without this, you must generate a trust token on the NUC console (Step 8).
-
Ensure the Incus client is installed (e.g.,
aqua installor Homebrew). -
Create the client certificate (if you don't have one yet):
incus remote generate-certificate
This creates ~/.config/incus/client.crt and client.key. If certificates already exist, skip to the next step.
- Retrieve the certificate for the customizer:
incus remote get-client-certificate
This prints the certificate. Copy the full output (including -----BEGIN CERTIFICATE----- and -----END CERTIFICATE-----).
- Add the certificate in the IncusOS Customizer — In the certificate / TLS client certificate section, paste the certificate or use the customizer's "Generate" or "Add" option to include it in the image. The customizer will embed it in the install seed so Incus trusts your machine when it first starts.
With the certificate embedded, you can add the remote in Step 9 without needing a trust token from the NUC console.
If your NUC has both NVMe and SATA drives, nvme- ensures IncusOS installs to the faster NVMe drive. To target a specific NVMe drive (e.g., when multiple are present), use a more specific partial match from /dev/disk/by-id/ such as nvme-WD_BLACK or the full by-id name.
- Configure your image settings (including the options above)
- Download the generated image file (typically named like
IncusOS_YYYYMMDDHHMM.img)
Note: After downloading, note the full path to the image file. You'll need this for Step 3.
Step 2: Set Windsor context
Initialize and set the nuc-incusos context:
windsor init nuc-incusos
windsor context set nuc-incusos
Step 3: Update windsor.yaml
Determine the target disk
Use task device:list-disks to get a list of disks. Set the USB_DISK environment variable accordingly.
Add variables to windsor.yaml
Add or update the environment section in contexts/nuc-incusos/windsor.yaml:
environment:
  USB_DISK: "/dev/disk4"

  # Path to the downloaded IncusOS image file (from Step 1)
  INCUS_IMAGE_FILE: "/Users/$USER/Downloads/IncusOS_202601260318.img"
  INCUS_REMOTE_IP_0: "192.168.2.101 [or 170]"
Replace the placeholder values with your actual configuration:
USB_DISK: The device identifier for your USB memory device (usetask device:list-disksto identify it)INCUS_IMAGE_FILE: The path to your downloaded IncusOS image fileINCUS_REMOTE_IP_0: IP address for the Incus server (used by deployment runbooks)
Step 4: Prepare the image in the workspace
Copy the downloaded image to the workspace devices folder:
task device:prepare-incus-image
This copies the image file specified in INCUS_IMAGE_FILE to contexts/nuc-incusos/devices/incus/incusos.img.
Step 5: Prepare the Intel NUC
Update the BIOS
Before installing IncusOS, ensure your NUC's BIOS is up to date. Follow the full runbook for step-by-step instructions:
Wipe existing storage
If the NUC previously had Ubuntu or another operating system installed, you should wipe the storage device before installing IncusOS. This ensures a clean installation without bootloader or partition conflicts.
Boot from USB first: You cannot wipe the boot disk while the system is running from it. Boot the NUC from an Ubuntu install disk (USB), and when prompted choose "Try Ubuntu" (do not install). This runs Ubuntu from the USB so the internal drives can be wiped. See the Ubuntu Setup runbook for creating an Ubuntu bootable USB if needed.
Warning: This will destroy all data on the storage device. Ensure you have backups of any important data.
# From Ubuntu Live (Try Ubuntu) session
# Identify the storage device first
lsblk
# or
sudo fdisk -l

# Wipe the partition table (replace /dev/nvme0n1 with your device)
sudo wipefs -a /dev/nvme0n1
sudo wipefs -a /dev/sda
Note: After wiping, if you reboot the NUC, you should see "A bootable device has not been detected." — this confirms the storage has been wiped and is ready for IncusOS installation.
Configure Secure Boot
Access the NUC's BIOS settings (typically by pressing F2 during boot):
- Navigate to the Boot tab in BIOS settings
- In the Secure Boot section:
- Select "Custom" Secure Boot Mode
- Select "Reset to Setup Mode" to enable custom mode
NOTE: The two nucs I have are different. The point here is to cause the previous secure keys to be regenerated the next time we boot on the USB device.
- In the Boot Priority section:
- Select "Boot USB devices First" to prioritize USB boot
- Enable "USB" booting if not already enabled
Important: Secure Boot must be configured in "Custom" mode for IncusOS to install and boot properly.
Step 6: Prepare USB boot device
Write IncusOS image to USB
Write the IncusOS image to your USB memory device. This process will erase all existing data on the device.
task device:write-incus-disk [-- 1]
To write to multiple USB devices in parallel (e.g., 3 devices starting from USB_DISK):
task device:write-incus-disk -- 3
Eject the USB device
After writing completes, safely eject the device(s):
task device:eject-disk [-- 1]
The eject-disk task will automatically unmount the disks before ejecting them.
Step 7: Boot and install IncusOS
- Insert the boot media: Insert the USB memory device into a USB port on your Intel NUC
- Connect network: Ensure the Intel NUC is connected to your network via Ethernet
- Power on: Connect power to the Intel NUC and turn it on
- Boot from USB: The NUC should automatically boot from USB if configured correctly, or use the boot menu (typically F10) to select the USB device
- Wait for installation: IncusOS will boot and begin installation to the internal storage device
- Note the IP address: After installation completes, the NUC will display its IP address on the console, or you can find it via your router's DHCP client list
Note: The installation process will automatically install IncusOS to the internal storage device. After installation completes and the system reboots, you can remove the USB boot device.
Step 8: Generate trust token (if needed)
If you embedded a client certificate in the IncusOS Customizer (Step 1), you can skip this step and go to Step 9.
Otherwise, generate a trust token on the NUC so you can add the remote from your Mac. The token must be created on the same Incus server you are connecting to.
Option A: Physical console on the NUC
At the NUC's physical console, run:
incus config trust add <remote-name>
Replace <remote-name> with the name you'll use when adding the remote (e.g., nuc). Copy the token output; you'll paste it when running incus remote add in Step 9.
Option B: Incus Web UI
- Open a browser and go to
https://<nuc-ip-address>:8443 - Accept the certificate warning if prompted
- On the setup page, use the "Add token" or "Trust" section to generate a token
- Copy the token; you'll paste it when running
incus remote addin Step 9
Step 9: Connect to Incus server
Add the remote server
Add your Incus server as a remote:
incus remote add <remote-name> https://<nuc-ip-address>:8443
Replace:
- <remote-name> with a name for this remote (e.g., nuc, incus-server, forest-shadows)
- <nuc-ip-address> with the actual IP address of your NUC (e.g., 192.168.2.101)
Example:
incus remote add nuc https://192.168.2.101:8443
Trust the certificate
When adding the remote, you'll be prompted to accept the server's certificate. Type yes to trust the certificate.
If you need to trust the certificate later:
incus remote set-url <remote-name> https://<nuc-ip-address>:8443
Verify connection
List your remotes to verify the connection:
incus remote list
You should see your new remote listed. Test the connection:
# List instances (should be empty initially)
incus list <remote-name>:

# Get server information
incus info <remote-name>:
Set as default remote
Important: The following steps rely on setting the current remote to the NUC.
If you want to make this your default remote:
incus remote switch <remote-name>
After switching, you can omit the remote name in commands:
incus list
incus info
Step 10: Configure direct network attachment
To allow VMs to get IP addresses directly on your physical network, you need to configure a physical network interface for direct attachment. This creates a network that bypasses NAT and connects VMs directly to your physical network.
View current network configuration
First, check the current network configuration:
incus admin os system network show
This shows your network interfaces and their current roles.
Add instances role to physical interface
Edit the network configuration to add the instances role to your physical network interface (typically eno1 or eth0):
incus admin os system network edit
In the editor, find your physical interface (e.g., eno1) in the config.interfaces section. Add a roles field if it doesn't exist, and include instances in the list:
config:
  interfaces:
  - addresses:
    - dhcp4
    - slaac
    hwaddr: 88:ae:dd:03:f9:f4
    name: eno1
    required_for_online: "no"
    roles:          # Add this field if it doesn't exist
    - management
    - cluster
    - instances     # Add this line
...
state:
  interfaces:
    eno1:
      addresses:
      - 192.168.2.101
      - fd55:b018:d18b:462e:8aae:ddff:fe03:f9f4
      hwaddr: 88:ae:dd:03:f9:f4
      mtu: 1500
      roles:
      - management
      - cluster
      - instances
Important:
- The roles field must be added to the config.interfaces section (not just the state section)
- Make sure the YAML indentation is correct (2 spaces)
- Save the file (in vim: press Esc, then type :wq and press Enter; in nano: press Ctrl+X, then Y, then Enter)
After saving, the configuration will be applied automatically. Verify the change:
incus admin os system network show
You should see instances in the state.interfaces.eno1.roles list.
Create physical network
After the configuration is applied, create a managed physical network:
task incus:create-physical-network
This creates a physical network that directly attaches to your host's network interface, allowing VMs to get IP addresses directly from your physical network's DHCP server.
Note:
- If the physical network already exists, the task will verify it's correctly configured and skip creation. If you need to recreate it, delete it first with incus network delete <remote-name>:<interface-name>.
- Replace eno1 with your actual physical network interface name if different. Common interface names include eno1, eth0, enp5s0, etc.
- You can override the interface name by setting the PHYSICAL_INTERFACE environment variable in your windsor.yaml file.
- After this step, VMs launched with this network will get IP addresses directly from your physical network's DHCP server, bypassing NAT.
Step 11: Access Incus web UI
Incus provides a web-based user interface that you can access through your browser. To use the web UI, you'll need to set up browser certificate authentication.
Access the setup page
Open your web browser and navigate to:
https://<nuc-ip-address>:8443
Replace <nuc-ip-address> with your NUC's IP address (e.g., https://192.168.2.101:8443).
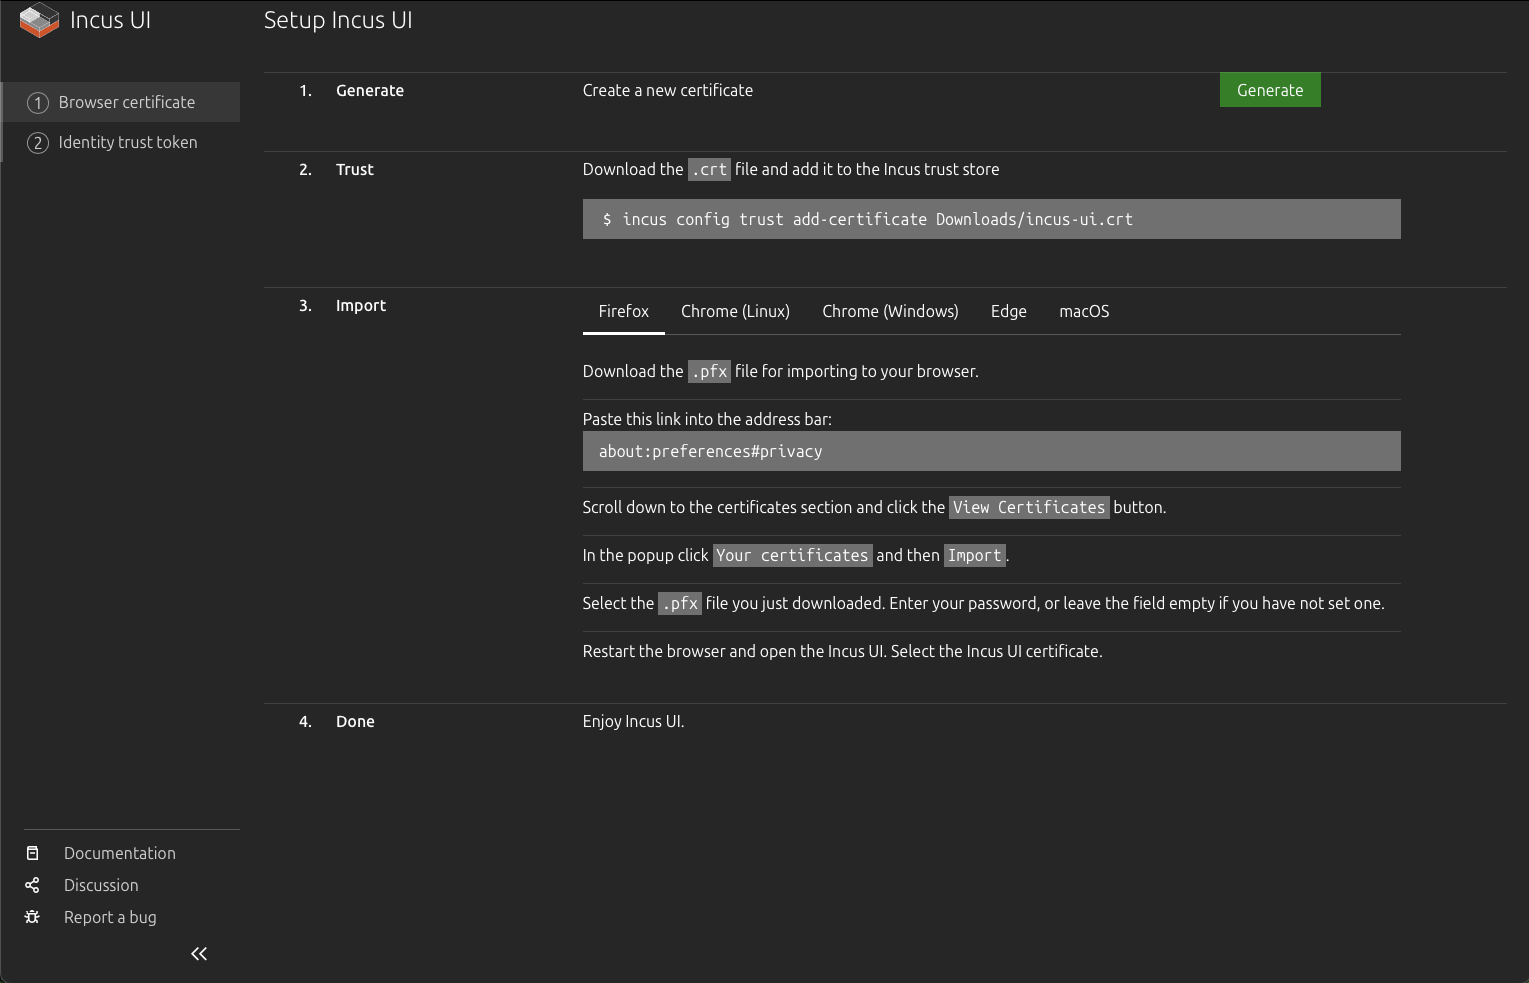
You'll be presented with the Incus UI setup page, which guides you through the certificate setup process:
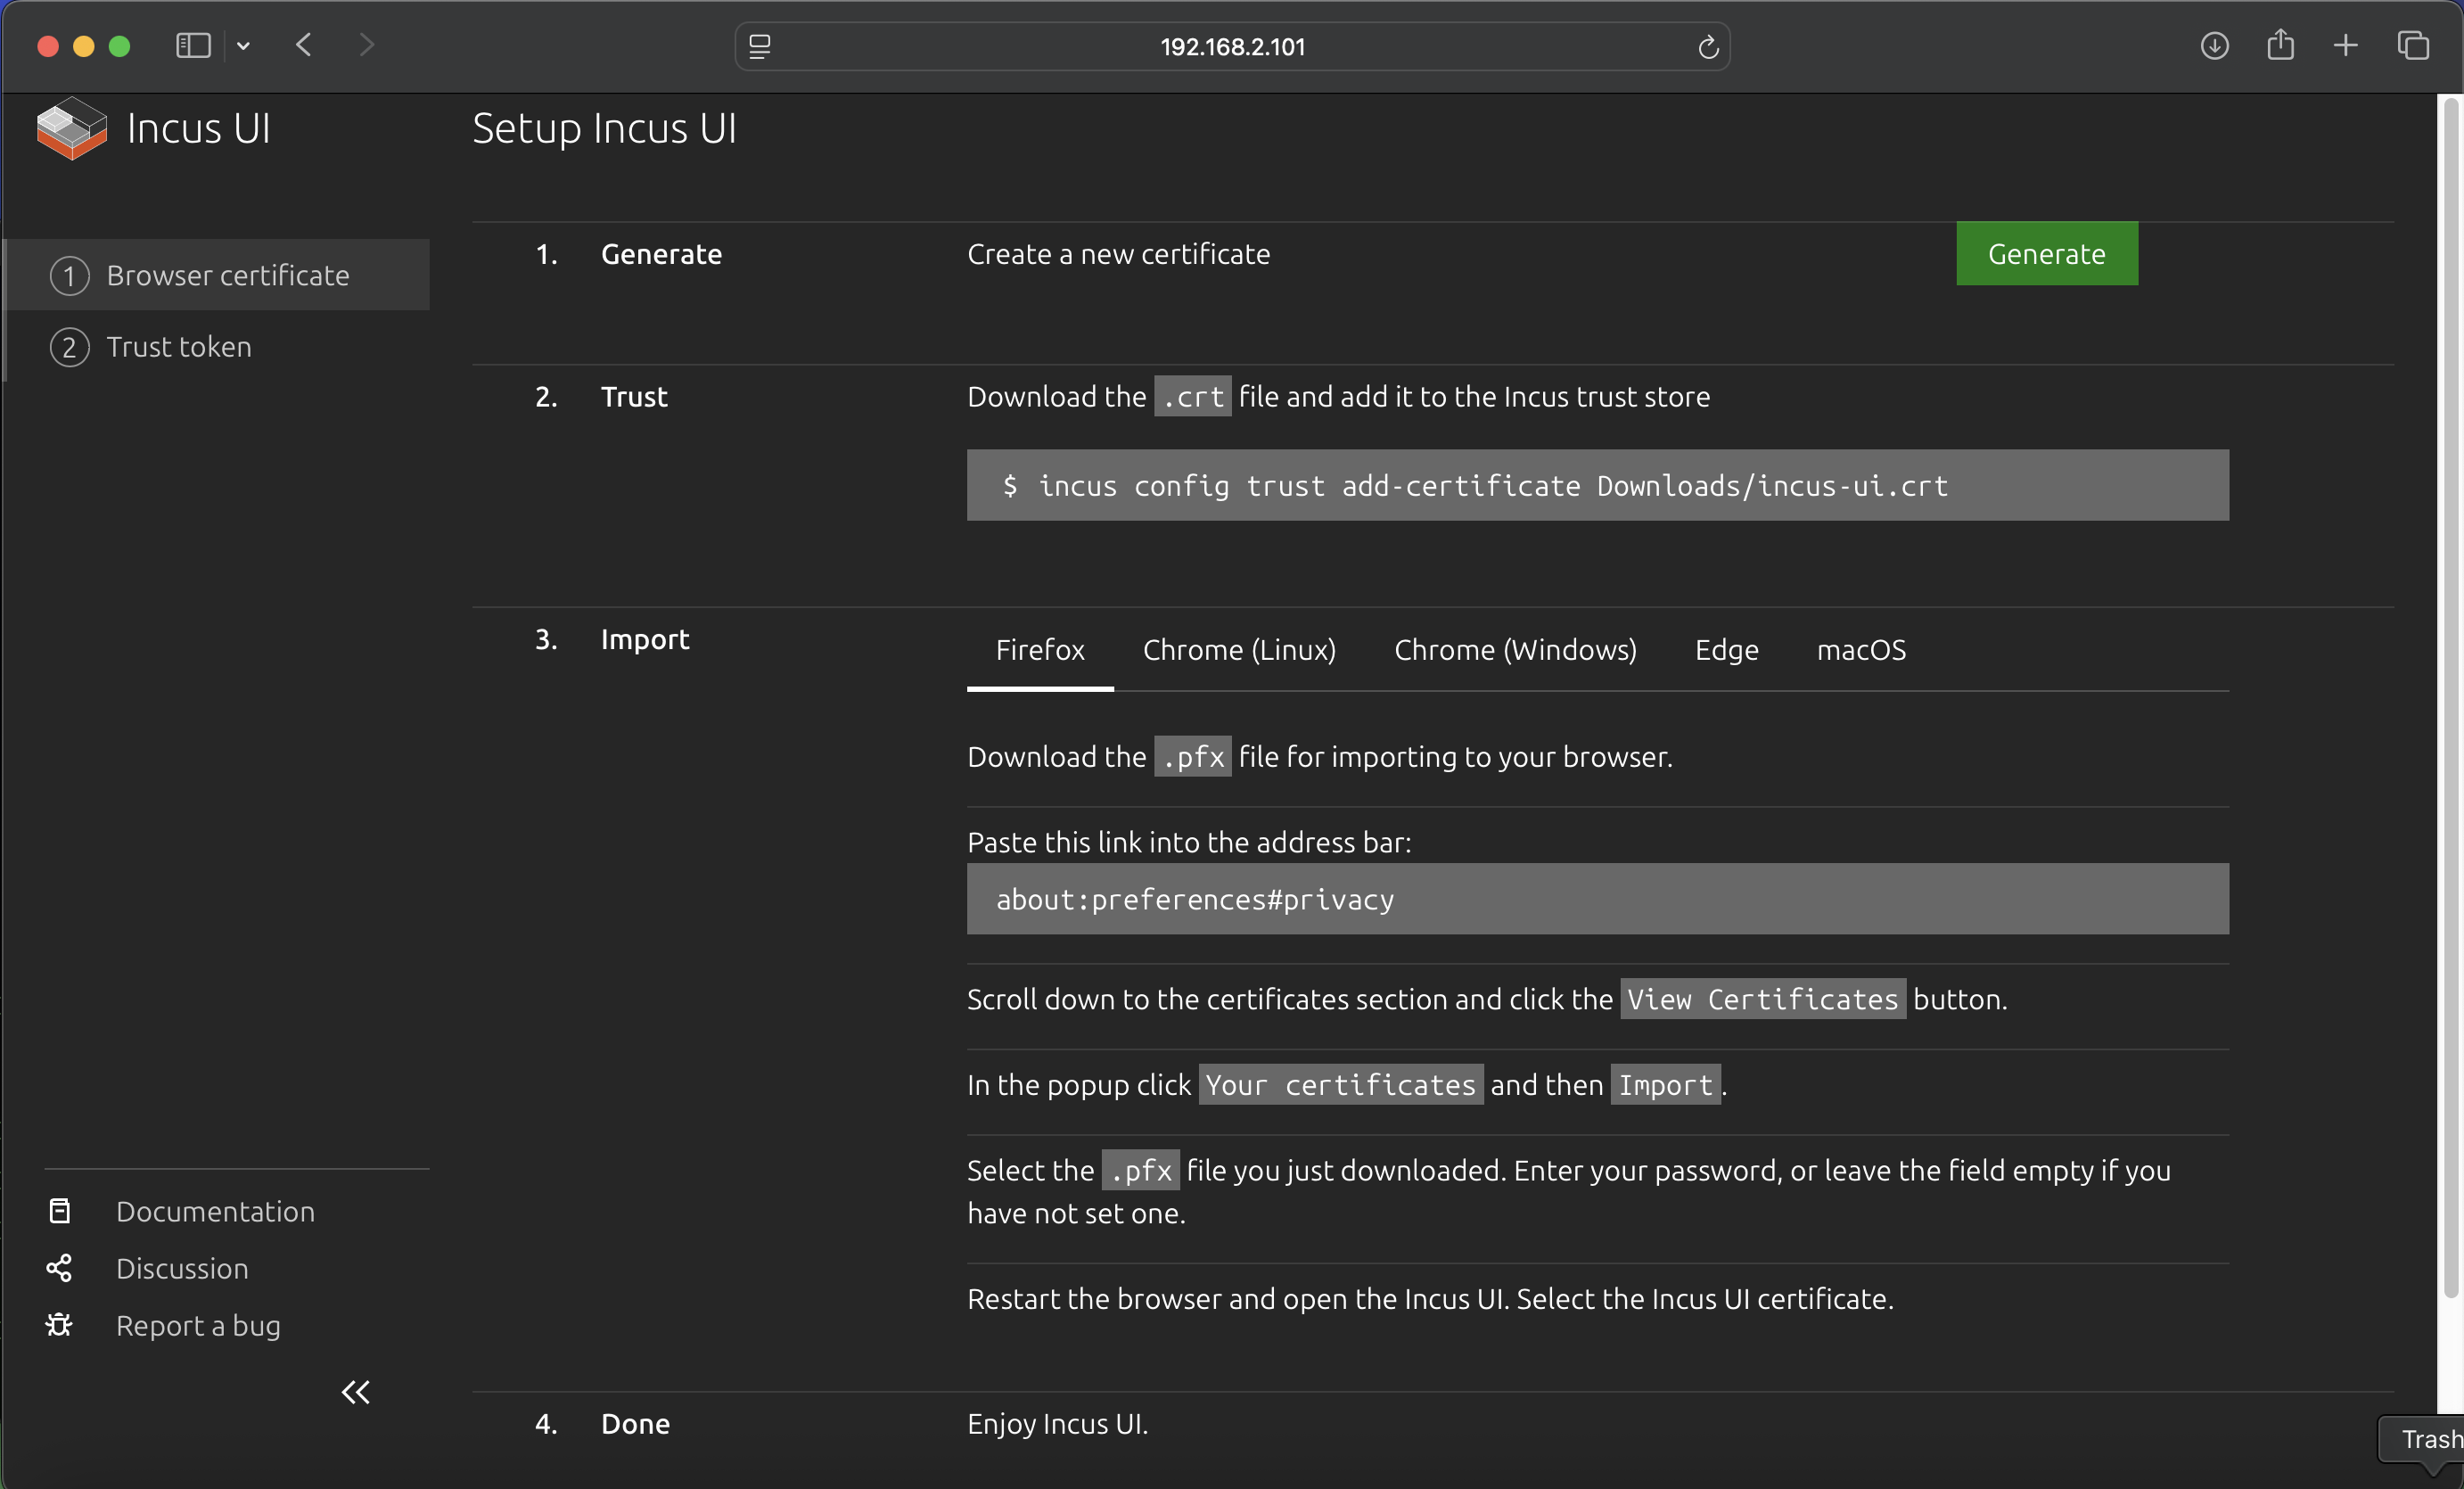
Generate certificate
- On the setup page, click the "Generate" button in the "1. Generate" section
- This creates a new certificate for browser access
- The certificate files (
.crtand.pfx) will be available for download
Trust certificate (CLI)
Add the certificate to the Incus CLI trust store so you can use the CLI with the same certificate:
# Download the .crt file first, then add it to trust store
incus config trust add-certificate /Users/$USER/Downloads/incus-ui.crt
Replace /Users/$USER/Downloads/incus-ui.crt with the actual path where you downloaded the certificate file.
Import certificate to browser
To access the Incus UI through your browser, you need to import the certificate into your browser:
- Download the
.pfxfile from the setup page - Import into your browser (instructions vary by browser):
Firefox:
- Navigate to about:preferences#privacy in the address bar
- Scroll down to the "Certificates" section
- Click "View Certificates"
- In the popup, click "Your certificates" tab
- Click "Import"
- Select the .pfx file you downloaded
- Enter the password (or leave empty if no password was set)
- Restart Firefox
Chrome/Edge (Linux/Windows):
- Open browser settings
- Navigate to Privacy and Security → Security → Manage certificates
- Click "Your certificates" tab
- Click "Import"
- Select the .pfx file
- Enter the password if prompted
- Restart the browser
macOS (Safari/Chrome):
- Open Keychain Access application
- Select "login" keychain
- Go to File → Import Items
- Select the .pfx file
- Enter the password if prompted
- Restart your browser
- Restart your browser after importing the certificate
- Access the Incus UI: Navigate to
https://<nuc-ip-address>:8443again - Select the certificate: When prompted, select the Incus UI certificate you just imported
Using the web UI
Once the certificate is imported and you've restarted your browser, you can:
- Access the Incus UI at
https://<nuc-ip-address>:8443 - Manage instances (containers and VMs) through the web interface
- View storage pools, networks, and profiles
- Monitor system resources and instance status
- Create, start, stop, and delete instances
- Access instance consoles
The web UI provides a graphical interface for all Incus operations, making it easy to manage your infrastructure without using the command line.
Step 12: Create ZFS storage pool for VMs
The NUC uses the local pool for the system (IncusOS). For VMs (e.g. windsor-vm, dev-vm, test-runner) you need a second pool, fast, on a second physical disk. That gives you enough space (e.g. 120GB per VM) and allows ZFS block mode for better disk I/O. This step is required if you plan to run VMs from this NUC.
Prerequisite: The NUC must have two physical disks—one for IncusOS (backs local), one for the fast pool. If it has only one disk, you cannot create fast; you would run VMs on local and be limited by that pool’s free space.
All commands below run from your laptop; the Incus daemon on the NUC resolves paths. No SSH required.
1. Switch to the NUC remote
Use the remote name you added for this NUC (e.g. nuc or nuc-2):
incus remote switch <remote-name>
Example:
incus remote switch nuc-2
2. List host disks and find the second disk
IncusOS exposes host storage via the Incus API. Run:
incus admin os system storage show
In the output, find state.drives. You will see one drive per physical disk, for example:
state:
  drives:
  - boot: true
    id: /dev/disk/by-id/nvme-WDC_WDS500G2B0C-00PXH0_201016803494
    member_pool: local
    model_name: WDC WDS500G2B0C-00PXH0
    ...
  - boot: false
    id: /dev/disk/by-id/wwn-0x500a0751e6115323
    model_name: CT500MX500SSD1
    ...
- The disk with
boot: trueandmember_pool: localis the system disk. Do not use it forfast. - The disk with
boot: falseand nomember_pool(or not in a pool) is the second disk. Copy itsidvalue—that is the full-disk by-id path you will use in step 4.
Use the full id path. Do not use any path ending in -partN (those are partitions of the system disk and will fail).
3. Create the fast pool on that disk
Create the pool using the second disk’s by-id (the id from step 2):
incus storage create fast zfs source=/dev/disk/by-id/<second-disk-by-id>
Example (second disk is a Crucial MX500):
incus storage create fast zfs source=/dev/disk/by-id/wwn-0x500a0751e6115323
The pool size will be the size of that disk (minus a small ZFS overhead).
4. Verify
incus storage list
incus storage info fast
You should see fast in the list and total space roughly equal to the second disk’s capacity.
Troubleshooting
| Error | Cause | Fix |
|---|---|---|
| "is part of active pool 'local'" | You used a partition (e.g. a path ending in -part11) or the system disk. |
Use the full-disk by-id of the second drive from incus admin os system storage show (the one with boot: false and no member_pool). |
| "is in use and contains a unknown filesystem" | You used the system disk (the one that backs local). |
Use the other physical disk. If the NUC has only one disk, add a second drive or run VMs on local with limited space. |
For a device inventory (which disk backs fast on each NUC), see the deployment repo’s device reference (e.g. forest-shadows docs/runbooks/device-reference.md).
Using the pool with VMs
After the pool exists, set your Windsor context (e.g. windsor-vm, dev-vm, test-runner) to use it. In the context’s windsor.yaml, set VM_STORAGE_POOL: fast and, for better disk I/O, VM_DISK_ZFS_BLOCK_MODE: "true". See your workspace’s runbook on Incus VM disk performance (e.g. docs/runbooks/debug/incus-vm-disk-performance.md) for full options.
Step 13: Get client certificate (optional)
If you need to retrieve the client certificate for authentication or documentation purposes:
incus remote get-client-certificate <remote-name>
This will display the client certificate that was generated when you first connected to the server.
Verification
Verify your Incus installation is working correctly:
# Check server information
incus info

# List storage pools
incus storage list

# List networks
incus network list

# List available images
incus image list images:

# Test creating an instance
incus launch images:ubuntu/24.04 test-instance
incus list
incus delete test-instance
Your Incus server should be fully operational and ready for use.
Getting device information
When working with Incus, you may need to identify storage devices by their persistent IDs rather than device names like /dev/nvme0n1. Incus uses persistent device identifiers to ensure consistent device naming.
List devices by ID
# List all devices with persistent IDs
ls -la /dev/disk/by-id/

# Filter for NVMe devices
ls -la /dev/disk/by-id/ | grep nvme

# Filter for SATA devices
ls -la /dev/disk/by-id/ | grep sda
Example output:
nvme-WD_BLACK_SN850X_1000GB_23436M801614— NVMe device with model and serialnvme-eui.e8238fa6bf530001001b448b4ce05e8e— NVMe EUI identifierata-SPCC_Solid_State_Disk_AA230815S325622103— SATA device identifier
These persistent IDs are useful when configuring storage pools or referencing devices in Incus configurations, as they remain consistent across reboots and system changes.
Troubleshooting
NUC not booting from USB
- Verify USB boot is enabled in BIOS/UEFI settings
- Check that "Boot USB devices First" is selected in boot priority
- Try a different USB port on the NUC
- Verify the image was written correctly to the USB device
- Ensure the USB device is properly formatted and recognized by the BIOS
Secure Boot issues
- Verify Secure Boot is set to "Custom" mode, not "Standard"
- Ensure "Reset to Setup Mode" has been selected
- Check that the IncusOS image supports Secure Boot (modern images should)
- If issues persist, try disabling Secure Boot temporarily to test, then re-enable
Cannot connect to Incus server
- Verify the NUC has network connectivity (check Ethernet connection)
- Check that the IP address is correct
- Ensure port 8443 is not blocked by firewall
- Verify the Incus service is running on the NUC:
systemctl status incus(if you have console access) - Try accessing the web UI:
https://<nuc-ip-address>:8443in a browser
Installation fails
- Verify the storage device has at least 50GiB of free space
- Check that the storage device was properly wiped before installation
- Ensure TPM 2.0 is available and enabled in BIOS
- Verify the NUC model is compatible (x86_64, 5 years old or newer)
- Check console output for specific error messages
Wiping the boot disk using Ubuntu Live USB
If you need to completely wipe the NUC's boot disk to start fresh (for example, if IncusOS installation failed or you want to reinstall), you can use an Ubuntu Live USB. See the Ubuntu Setup runbook for creating an Ubuntu bootable USB, then:
- Boot from Ubuntu Live USB: Insert the USB, power on the NUC, and choose "Try Ubuntu"
- Turn off Secure Boot in BIOS if needed
- Wipe the disk: In a terminal, run:
# List all disks to identify the NUC's internal storage
sudo lsblk
# or
sudo fdisk -l

# Identify your disk (typically /dev/nvme0n1 for NVMe or /dev/sda for SATA)
# Wipe the partition table (quick method)
sudo wipefs -a /dev/nvme0n1

# Or zero the first 10MB to destroy partition table
sudo dd if=/dev/zero of=/dev/nvme0n1 bs=1M count=10
Warning: Replace /dev/nvme0n1 with your actual disk device. Be absolutely certain you're targeting the correct disk, as this operation is destructive and cannot be undone.
After wiping, reboot and install IncusOS from USB again.
Certificate errors
- Verify the server's certificate hasn't changed (may indicate a different server)
- Check system time is correct on both client and server
Next steps
After successfully installing IncusOS:
- Create storage pools: If you skipped Step 12, set up a ZFS storage pool (e.g.
fast) for better VM disk I/O, or use the defaultlocalpool - Configure networks: Set up bridge networks for instance connectivity (Step 10 covers direct physical network attachment)
- Launch instances: Create containers and virtual machines
- Set up profiles: Create instance profiles for common configurations
- Configure backups: Set up automated backups for your instances
- Explore features: Learn about snapshots, migrations, and clustering
Example: Launching and accessing an instance
Launch an instance
Launch a new container instance on the remote Incus server. To launch on a remote server, prefix the instance name with the remote name followed by a colon:
# Launch an Ubuntu 24.04 container named "my-container" on the remote server
incus launch images:ubuntu/24.04 <remote-name>:my-container
Replace <remote-name> with the name you used when adding the remote (e.g., nuc).
Important: Do not use the --target flag when launching instances on a remote server unless you have a clustered setup.
The instance will start automatically after creation. Verify it's running:
# List all instances on the remote
incus list <remote-name>:

# Get detailed information about the instance
incus info <remote-name>:my-container
If you've set the remote as your default, you can omit the remote name prefix:
incus launch images:ubuntu/24.04 my-container
incus list
incus info my-container
Using incus exec
The simplest way to access the container is using incus exec:
# Execute a bash shell in the container on the remote
incus exec <remote-name>:my-container -- bash

# Execute any command
incus exec <remote-name>:my-container -- ls -la
incus exec <remote-name>:my-container -- apt update
Accessing virtual machines
If you're using virtual machines instead of containers, the process is similar but VMs have their own IP addresses on your network:
# Launch a VM on the remote server
incus launch images:ubuntu/24.04 my-vm --vm

# Get VM information
incus info my-vm

# Access via console (if SSH isn't configured)
incus console my-vm